dbtv2.pl (G3 to G6 PAMAM protonated in single run)
DBT
was tested for generating dendrimer structure
up to G8. For any query and comments
please send mail to dbt.query aT gmail.com. This tool works fine with
GAFF. We have not tried using other available force field in AMBER.
Below we give outline procedure generating G3 to G6 protonated PAMAM dendrimer
using dbtv2.pl in single run.
Tutorial with example
Requirements: Linux with latest PERL-Tk, AMBER10 and AMBERTOOL-1.2 (Other versions not tried).
While preparing this tutorial it was assumed that user has some prior knowledge/experience with AMBER software.
Download
DBT.tar. It contains necessary files to run DBT PERL-Tk script and
README file. Extract DBT.tar.
Here, the tutorial for generating dendrimer using dbtv2.pl is illustrated by taking example of protonated PAMAM dendrimer (G3 to G6) which uses library named pamam_neutral_EDA.lib and GAFF force field. If users are using their own residues in some library then, three residues should be named as aaa (core), bbb (repeating fragment) and ccc (terminals) only. Here in pamam_neutral_EDA.lib residues are named as aaa, bbb and ccc (in this tutorial we will use only protonated form of ccc residue).
Steps for generating 3D structure of PAMAM (G3 to G6) protonated dendrimer using DBT+AMBER modules:
$AMBERHOME should be defined in .bashrc file. If not done, you can do it simply by adding these two lines in .bashrc file in home:
export AMBERHOME=/your/path/to/amber10
export PATH=$PATH:$AMBERHOME/exe
This was for bash terminal. One can define $AMBERHOME in cshrc also.
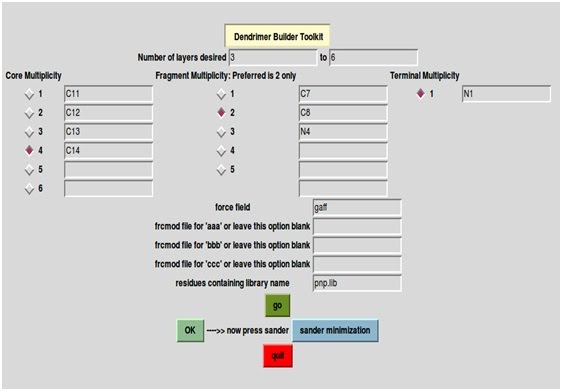
2) In number of layers
desired field enter 3 (for G3 PAMAM) and in "to" field enter 6. These numbers will run loops in such a
way that three to six layers of bbb will be put around core aaa and finally
terminals ccc will join the bbb. Note: You can give any number like 3 to 4 or 1 to 7 or if one desires to build only single generation dendrimer, e.g. G3, then put number of layers 3 to 3. So present example will generate G3, G4, G5 and G6 protonated PAMAM dendrimers.
3) Core Multiplicity is number of arms of central core (aaa residue in pamam_neutral_EDA.lib): set it 4 by clicking between 1 to 6 buttons. Then, write the name of joining atoms that you want to join with bbb. Only one atom name in each box, here it is C11, C12, C13 and C14. (For your own residues and library the name of joining atoms can be seen in xleap --> loadoff pamam_neutral_EDA.lib --> edit aaa --> display names or also from your.ac file while preparing residues. In this tutorial, you can see the atom name by loading pamam_neutral_EDA.lib in xleap).
4) Fragment multiplicity is number of arms minus one, that is n-1. Set it 2 in this case (3 arms - 1) and write atom names. One atom name in each box, here it is C7, C8, N4. The name of joining atoms can be seen in xleap --> loadoff pamam_neutral_EDA.lib --> edit bbb --> display names or also from your.ac file while preparing residues.
Important: Please note, the atom which becomes joining head atom is written last. Here it is N4.
5) Terminal multiplicity is by default set to 1 only. User cannot change it. Write the name of joining atom (here it is N1), which is going to attach with repeating fragment atom (bbb residue). The name of joining atoms can be seen in xleap --> loadoff pamam_neutral_EDA.lib --> edit ccc --> display names or also from your.ac file while preparing residues.
6) Write the name of force field file, here it is gaff.
7) Write the name of frcmod file for residues aaa, bbb and ccc, if any, otherwise keep it blank. In this tutorial it is not desired.
8) Write residue containing library name. Here pamam_neutral_EDA.lib
9) Now click "go"
BUTTON, then click "OK" BUTTON and finally click "sander minimization" (NOTE: min.in should be there in your working directory. The number of steps you can modify according to your need). Read step 10 and 11 below.
*****
dbtv2.pl vs dbtv1_2.pl
Comparison: If you have used manual dbtv1_2.pl earlier then you will find difference at this step, as all layers will be added without manual interference. But there will be instances in future which can compel to use manual dbtv1_2.pl as one can have intermediate files which contains AMBER commands to join the residues. But in dbtv2.pl the AMBER commands are stored in temporary files which are washed away when one quits the perl. This has big advantage. Suppose one needs to build linear (read below also) or bi-forked polymer having 100 layers!!! (here layer would mean number of monomers). So by using dbtv2.pl , as compared to dbtv1_2.pl, one need not to see all those text files having AMBER instructions and also using dbtv1_2.pl for such cases will unnecessarily fill the directory where you are working.
User can provide their residues in library of desired multiplicity; core (upto 6) and fragment multiplicity (upto 5). Simplest case will be core multiplicity being 1 and fragment multiplicity also 1. This will generate linear polymer.
*****
10) When all dendrimer generations are built finally a message will be displayed at bottom of your terminal window displaying "JOB DONE".
11) PRESS "quit" button. You should now be able to see L3.mol2, L4.mol2, L5.mol2 and L6.mol2 ("L" means layer) which are G3, G4, G5 and G6 PAMAM respectively. These mol2 will be having gaff atom types. So please be sure to source gaff in xleap that is:
source leaprc.gaff
G3 = loadmol2 G3.mol2
edit G3
and so on...
"Note:
You will see only *.mol2 files not any intermediate *.out files which
are sander outputs and other files. This is because they are removed
knowingly or else there will be number of files in your working directory.
If you want all files should be retained you can use --info flag like this:
perl dbtv2.pl --info number
where number can have valid 0,1,2 or 999 values. If you try any other number like perl dbtv2.pl --info 328 DBT will quit displaying valid numbers allowed and what they do. This --info flag is not available in dbtv1_2.pl ".
Declaration:
1) The DBT could have written in more professional way, more short form, better algorithm or more user friendly.
2) Its further development depends on number of users, suggestions, comments etc., though support for users will be given and related query, suggestions, comments can be sent to maiti aT physics.iisc.ernet.in and please must 'cc' mail to dbt.query aT gmail.com (replace aT with @). Your comments and suggestions are strongly desired to keep DBT alive.
3) Geometry management is not that good as may be expected but newer versions will be better.
4) DBT alone cannot build dendrimer. It uses AMBER suite of programmes like xleap and sander modules for its functioning. DBT just calculates the number of residues to be joined according to the desired generation, and how they need to be joined is defined by set of xleap commands (dbt1,dbt2....dbtN files)which are input to xleap. DBT can be used to generate desired dendrimer of any core (upto 6) and fragment multiplicity (upto 5).